Hi.
Welcome. I am so very happy that you decided to stop by for a visit.
I
thought I might share something a little different with you today.
I’ve
read quite a few blog posts lately with instructions for PicMonkey. It seems to
be very popular with most bloggers.
I
personally haven’t used it. When it comes to photos or images, Microsoft Word
and Paint have all the features I need. I’ve used these programs for a
lot of years so I was glad to be able to find a laptop that at least had the
Starter version already installed.
So,
for all those bloggers out there who also have Word and Paint, or are
considering getting those programs, I am going to show you what they can do.
Today
I’m going to share the many ways that you can format a photo. Are you ready?
Let’s go!
Insert Photo
First
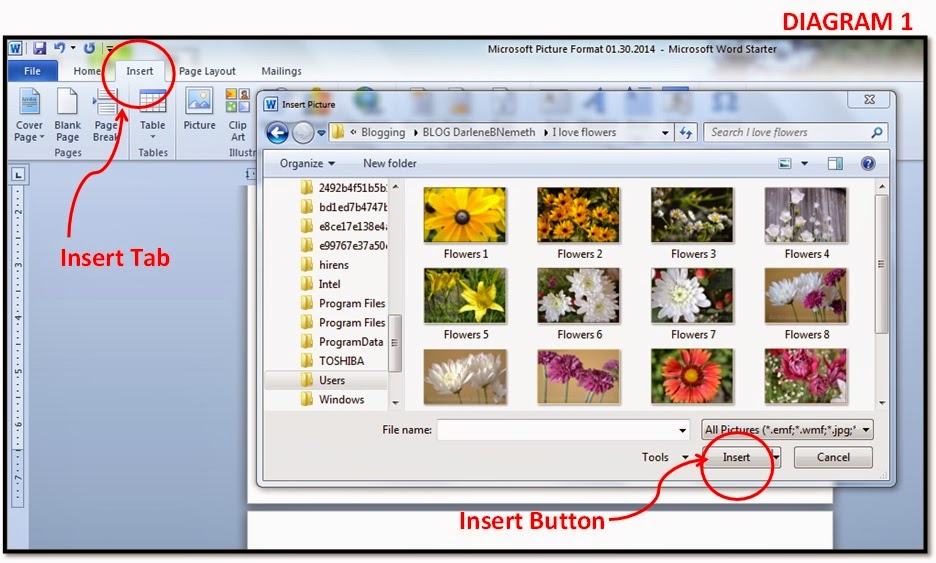
you will need to insert a picture into a word document.
Click
on the Insert Tab as shown on the Diagram 1.
A
window pops up. Locate your picture on your computer. Select it by clicking on
it once then press the insert button or double click the image.
Formatting the Picture
Now
comes the fun part.
Select
your picture by clicking on it once.
A
new tab will appear on the top of your screen. It will say, Picture Tools,
Format. Click
on that tab.
Look
at Diagram 2. These are all your photo formatting tools. We’re concentrating on
these three: Corrections, Color, and Artistic Effects.
Correction Tool
Each
photo adjustment tool has set variations you can choose from. Look at
Diagram 3.
You
can tell which variation is being used on this particular photo because it is
outlined in yellow. This one is set as the original image.
Sharpen and Soften.
Any
deviation to the left of this section makes the image less in focus – a little
blurrier. Moving to the right sharpens the photo image. This can help slightly
if you photo is on the blurry side or you want to see more detail.
Brightness and Contrast.
If
your image is too dark or too light this is where you can make those changes.
Picture Correction Options.
Each
adjustment tool also has further options where you can fine tune the variations
– in case the standard ones aren’t to your liking.
Select
the Picture Correction Options button as shown in Diagram 3. The Format
Picture window pops up as shown in Diagram 4. Now you make very specific
changes as required.
Color Tool
Each
photo adjustment tool has set variations you can choose from: Color Saturation, Color Tone and Recolor as shown in Diagram 5.
Once
again, you can tell which variation is being used on this particular photo
because it is outlined in yellow.
This one is set as the original image.
Color Saturation
Color
Tone
Recolor
Artistic Effects Tool
Each
photo adjustment tool has set variations you can choose from. Look at
Diagram 9.
Once
again, you can tell which variation is being used on this particular photo
because it is highlighted in yellow.
This
one is set as the original image.
These
are all the artistic effects:
- None
- Marker
- Pencil gray scale
- Pencil Sketch
- Line Drawing
- Chalk Sketch
- Paint Strokes
- Paint Brush
- Glow Diffused
- Blur
- Light Screen
- Watercolor Sponge
- Film Grain
- Mosaic Bubbles
- Glass
- Cement
- Texturizer
- Criss Cross Etching
- Pastels Smooth
- Plastic Wrap
- Cut Out
- Photocopy
- Bright Edges
From
Microsoft Word Picture Format 7 to 15 are examples of the artistic effects.
Well
that's it for this week. Which is your favorite?
Next week I'll show you how to remove the background in your picture.
***************************
 I
have to share this exciting news. This post was featured at All Things Pretty
Thursday. Check it out HERE.
I
have to share this exciting news. This post was featured at All Things Pretty
Thursday. Check it out HERE.I just want to say thank you Leslie, Chrissy, and Kathy for hosting each week.
***************************
Yippee
Hooray. I've been featured today. Thanks so much Jennifer for featuring me at
your party.
 This
is what she had to say, Make Your Pics Pinteresting with these Tips from
Darlene Nemeth. These were some great tips. I've seen too many
wonderful posts that would have easily been passed over because of their
"Pinterestability"
Check
out Jennifer's blog and the other featured posts HERE.
Thank you Linda and Carol for featuring my blog post on your blog - Crafts a la mode.
To see the other featured blog posts at What To Do Weekends #59 please click HERE.
I am so grateful Susie for featuring my post on your site - Bowdabrablog.com.
This post was featured at Maz Kwok.com. It was linked at the Crafting Along Blog Hop and was included in the top three most clicked projects at Party #28.
Thank you Maz Kwok for hosting the party and thanks to everyone who clicked on my post.
Click HERE to check out the other featured posts.
Well
thanks for stopping by. I hope you enjoyed reading this post.
If
you would like to receive my blog updates please subscribe via email or follow
me on Twitter, Pinterest or Blog Lovin.
I
look forward to reading your comments. Make my day and leave one! We all learn
and grow together when we share!


